


Your shopping cart is currently empty.

Mastering Incubator Humidity: Why Egg Weight Loss is Key
Of the four critical factors in incubation—temperature, ventilation, turning, and humidity—humidity is often the most misunderstood and difficult to control. Conflicting advice is common, but getting it right is essential for a successful hatch. This guide from the Incubation Specialists at Brinsea will clarify what you need to know.
Key Takeaways
- The Goal is Weight Loss: The primary purpose of humidity control is to ensure eggs lose 13-15% of their initial weight by hatch day.
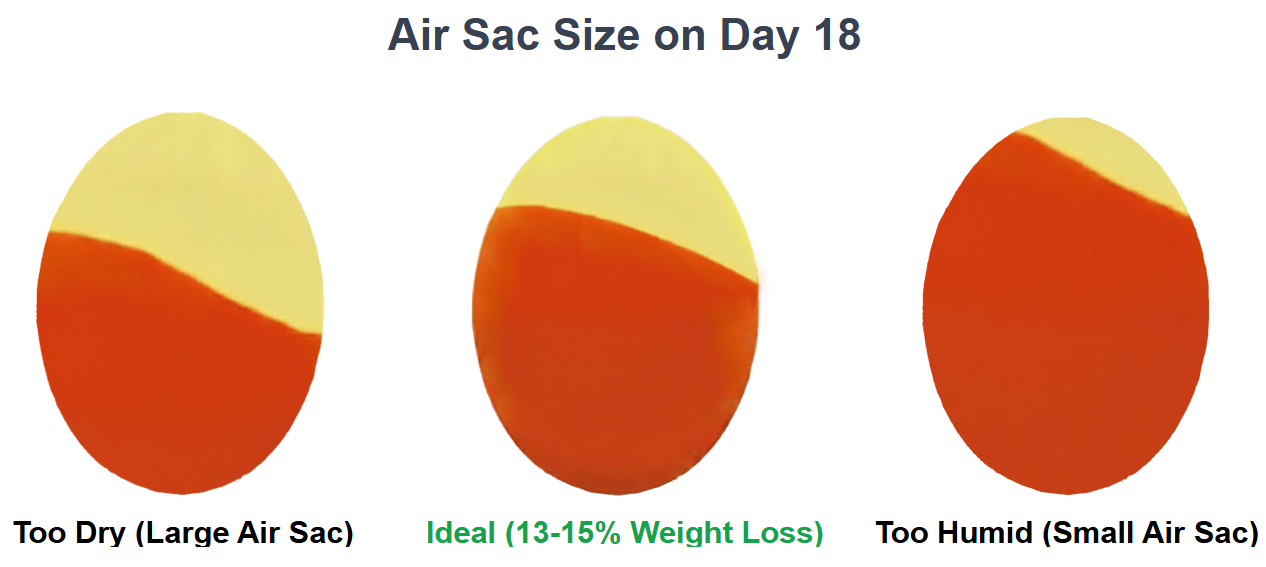
- High Humidity is More Dangerous: Too much humidity prevents adequate weight loss, leading to a small air sac and a high risk of the chick drowning or being unable to pip.
- Increase Humidity for Hatching: During the last 2-3 days (lockdown), humidity must be raised to at least 60-65% RH to keep the membrane soft and prevent "shrink-wrapping."
-
The Core Principle: Why Humidity Matters
Eggshells are porous, allowing moisture to escape throughout incubation. This process is essential for creating a large enough air sac inside the egg, which the chick uses to take its first breaths. The main goal of humidity control is to ensure the egg loses an ideal amount of weight (13-15%) from setting to hatching. This provides the chick with the perfect balance of space to breathe and move. For more on the science, you can review studies on eggshell conductance in poultry.
-
The Most Reliable Method: Weighing Eggs
While a reliable hygrometer is helpful, weighing eggs is the most accurate way to track moisture loss. The target for most bird species is a 13-15% loss of the original egg weight by the time they are ready to hatch.
1. Weigh & Plot: Weigh eggs on Day 0 and plot the starting point on a graph.2. Calculate Target: Calculate the target final weight (Start Weight x 0.87).3. Draw the Line: Draw a straight line from the start weight to the target end weight.4. Track Progress: Weigh the eggs every few days and plot their actual weight.5. Adjust: If the actual weight is above the line (not enough loss), decrease humidity. If it's below the line (too much loss), increase humidity.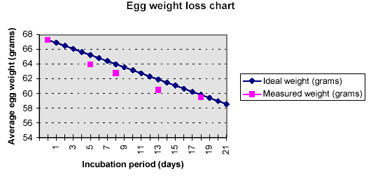
-
Humidity Guidelines by Species
While weighing is the most accurate method, these typical RH% ranges are excellent starting points. Remember that your local climate will affect these values.
Species Incubation Humidity (RH%) Lockdown Humidity (RH%) Chicken 45-50% 65%+ Duck 55-60% 70%+ Goose 60-65% 75%+ Quail (Bobwhite) 40-50% 65%+ Turkey 50-55% 70%+ Pro Tip: Waterfowl (ducks, geese) benefit from higher humidity throughout incubation compared to poultry due to their natural nesting environment. -
The Final Stage: Lockdown & Hatching
For the last 2-3 days ("lockdown"), humidity must be raised significantly. This is critical to keep the inner membrane soft. If the membrane dries out, it becomes tough and traps the chick, a condition called "shrink-wrapping." Raising humidity at the end will not significantly affect the total weight loss if it was correct beforehand.
Do not lift the incubator lid after the first chick hatches! This causes a sudden humidity drop, which can shrink-wrap the remaining chicks.
-
Success with Precision Humidity Control
"I always struggled with 'sticky chicks' until I started weighing my eggs. Following Brinsea's 13% weight loss rule gave me my best hatch yet. The EX pump on my Ovation 56 makes it foolproof!"
-
Frequently Asked Questions
Q: What should the humidity be for chicken eggs?
A: To achieve the target 13-15% weight loss, a good starting point is 45-50% RH for the first 18 days, increasing to 65% or more for the final 3 days of lockdown.
Q: How can I increase humidity without a pump?
A: You can increase the water's surface area by filling more water channels or carefully adding a clean, damp sponge. Reducing the incubator's ventilation will also trap more moisture, but never block all air holes.
Q: My EX pump seems to be running all the time. Is this normal?
A: In very dry ambient conditions, this can be normal as the pump works to maintain the set RH%. Ensure your incubator isn't in a drafty area. Using Brinsea's evaporating pads can help the pump work more efficiently by increasing the water's surface area.
Q: Should I spray my eggs with water?
A: No, Brinsea does not recommend this. It only raises humidity for a very short time and risks causing thermal shock to the embryos if the water is too cold.
-
Conclusion: Take Control of Your Hatch
While humidity can seem complex, focusing on the principle of gradual weight loss makes it manageable and reliable. By weighing your eggs or using a calibrated hygrometer, you can create the perfect environment for a successful hatch.
Brinsea's EX models with their integrated humidity pumps remove the guesswork, giving you precise control and peace of mind. Investing in the right tools and knowledge is the surest path to celebrating a brooder full of healthy chicks.
Share your hatch results with us! Tag @brinseaus on Instagram—we love to see your success stories.
-
Brinsea Auto Humidity Control Incubators
Fully automatic incubator with integrated humidity control for a stress-free hatch.